🦧 Ngrx?
ngrx는 Angular에서 사용되는 상태관리 라이브러리이다. 옛날에 기억으로는 Redux에 감명을 받았다는 것을 본적이 있다.
🐅 Ngrx 구조

구조는 위와 같으며
Component에서 Action을 호출하면 Reducer(연산처리 같은)으로 store에 저장한다. 그리고 selector를 통해 component에 보여줄수 있다.
Effects는 API를 사용할 경우 필요한 것이며, Actions을 호출할때 Effects에 등록된 Action을 호출하여 API를 호출하는 형식이다.
🚢 Ngrx 세팅
1-1. ☔ tsconfing.json에서 alias 설정
store의 경로를 alias로 설정한다.
{
    .
    .
    .
    .
    .
    "compilerOptions": {
	"paths": {
          	"@store/*":["src/app/store/*"],
        },
    }
}
1-2. 🚇 ngrx/store 설치
npm install @ngrx/store --save1-3. 🏨 폴더 세팅
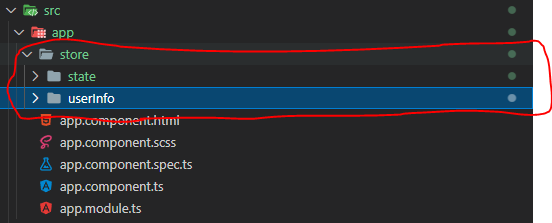
src < app < store < state
src < app < store < userInfo

1-4. ⚡ UserInfoState.ts 생성
userInfoState는 사용자 정보를 관리하는 인터페이스이다. 현재는 이름과 나이로 구성되어있다.
export interface UserInfoState{
    name:string;
    age:number;
}
1-5. 🌝 Actions 생성
//src < app < store < userInfo < userInfo.actions.ts
import { createAction,props } from '@ngrx/store';
import { UserInfoState } from "@store/state/userInfoState";

export const settingUserInfo = createAction(
    '[UserInfo] settingUserInfo',
    props<{userInfo:UserInfoState}>()
);
1-6. 🚲 Reducers 생성
// src < app < store < userInfo < userInfo.reducers.ts
import { createReducer, on } from '@ngrx/store';
import { settingUserInfo } from './userInfo.actions'
import { UserInfoState } from "@store/state/userInfoState";

//초기값 세팅
export const initialState:UserInfoState = {
    name:'',
    age:-1
}


export const userInfoReducer = createReducer(
    initialState,
    //세팅
    on(settingUserInfo,(state,{userInfo})=>({
        ...state,
        name:userInfo.name,
        age:userInfo.age
    })),
)
1-6. 🚜 selectors 생성
selectors를 통해 component에 보여줄 수 있다.
// src < app < store < userInfo < useInfo.selectors.ts
import { createFeatureSelector, createSelector } from '@ngrx/store';
import { UserInfoState } from "@store/state/userInfoState";

export const getUserInfoState = createFeatureSelector<UserInfoState>('userInfoState');

export const getUserInfo = createSelector(
    getUserInfoState,
    (state:UserInfoState) => state
)
1-7.🗻🌍 app.module.ts에 추가
// app.module.ts
//ngrx
import { StoreModule } from '@ngrx/store';
import { userInfoReducer } from "@store/userInfo/userInfo.reducers"

@NgModule({
  .
  .
  .
  imports: [
    .
    .
    .
    StoreModule.forRoot({userInfoState: userInfoReducer}),
  ],
  .
  .
  .
})
export class AppModule { }
1-8. 🧳 dev-tools 설치 및 세팅
npm install @ngrx/store-devtools --save
//ngrx dev-tools
import { StoreDevtoolsModule } from '@ngrx/store-devtools';


@NgModule({
  .
  .
  .
  imports: [
    .
    .
    .
    StoreDevtoolsModule.instrument({
      maxAge:25
    })
  ],
  .
  .
  .
})
export class AppModule { }
🚢 Component에서 Ngrx 사용하기
사용하고자 하는 컴퍼넌트에 아래와 같이 Store, UserInfoState, getUserInfo를 추가시키고 Obserable으로 받을수 있도록 변수를 선언해준다.
import { Component, OnInit } from '@angular/core';
import { Store } from '@ngrx/store'; // Store 선언
import { UserInfoState } from "@store/state/userInfoState" // 사용하고자 하는 UserInfoState선언
import { getUserInfo } from "@store/userInfo/useInfo.selectors"; // 사용하고자 하는 selectors 선언
import { Observable } from 'rxjs';
@Component({
  selector: 'app-ngrx-info',
  templateUrl: './ngrx-info.component.html',
  styleUrls: ['./ngrx-info.component.scss']
})
export class NgrxInfoComponent implements OnInit {
  userInfoState$!: Observable<UserInfoState>;
  constructor(private store:Store<{userInfoState:UserInfoState}>) { }

  ngOnInit(): void {
    this.userInfoState$ = this.store.select(getUserInfo); // select를 통해 Obserable형태의 변수에 담기
  }

}
그리고 사용하고자 하는 화면에 아래 처럼 콧수염 문법으로 표기한다.
<p>ngrx-info works!</p>

<h1>
    {{ ( userInfoState$ | async)?.name }}
</h1>
<h2>
    {{ ( userInfoState$ | async)?.age }}
</h2>
🚇 세팅 후기 및 다음에 할것
이번에 처음부터 Ngrx를 세팅을 해보았지만, 확실히 Vue에 비하면 어렵다고 생각한다. Rxjs도 알아야 하는 부분도 있고 해서 쉽지 않았다.
현재 Effects는 부분은 빠져있는데, 다음에는 API연동하여 Effects를 연동할 예정이다.
그리고 localstorage의 동기화도 작업도 추가해서 블로그 할 예정이다.
'Angular' 카테고리의 다른 글
| 🐏 Angular ng-content (0) | 2022.10.26 |
|---|---|
| 😓ngrx를 이용하여 에러난 파일처리 (0) | 2022.07.30 |
| Rxjs? (0) | 2022.02.19 |
| 🥷Angular의 다국어 관리 (0) | 2021.11.07 |


댓글